PostgreSQL Slony Step by step Installation and Configuration on windows environment
Contents:
INTRODUCTION
Slony-I is a PostgreSQL database replication tool and it is an Asynchronous replication system , and replicates data from one master database into one or more slave databases.
Replication is a database technique that enables us to store replica of objects of a database in another location/machine. And this replica of the production/main database can be used as a backup/failover in case of emergency. Further more, we can also prepare reports and do analysis from the replica database , and by doing so we can reduce the load on the production database.
It is a trigger based replication , where there will be triggers running on every replicated table that will catch data changes on the master. But the triggers does not catch schema changes and table truncates. These triggers will store the new data into an internal event queue and will be later communicated to the subscribed nodes.
In this article , we will going to see a step by step installation and configuration of Slony-I on windows environment. And we will have one master and one slave nodes for our demo.
CONCEPTS
| Node | A single PostgreSQL database instance is called a node. |
| Cluster | A set of PostgreSQL database instances available in the replication and has a name. |
| Daemon | A process that manages replication activity for nodes. |
| configuration file | A text file containing database connection information. |
| Engine | An instance of a daemon, identifiable by its node’s configuration file. |
| Service | A windows service that can run multiple engines. |
| Replication set | A set of tables and sequences that will be replicated to the slave nodes. |
| Event | An event represents any novelty in a cluster’s state such as modifications to the cluster’s configuration or modifications to data that is under replication. |
INSTALLATION
On windows environment it will be installed from internet directly through Application Stack Builder tool (embedded in PostgreSQL database).
From the already installed PostgreSQL database software on your machine click on the Application stack builder and then a wizard will display on the screen.
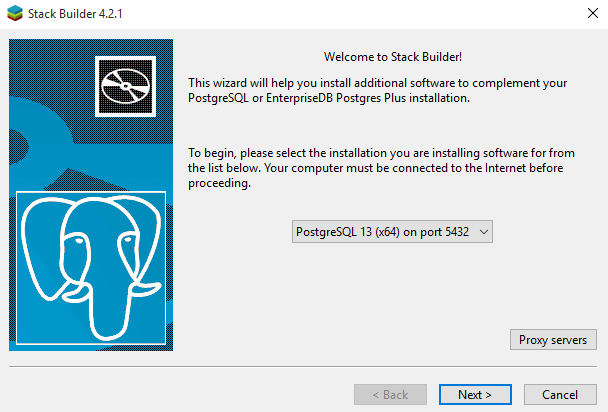
Then click the Next button above and the wizard below will display.
Once the wizard is displayed check the Slony-I for replication PostgreSQL and click next as shown below.
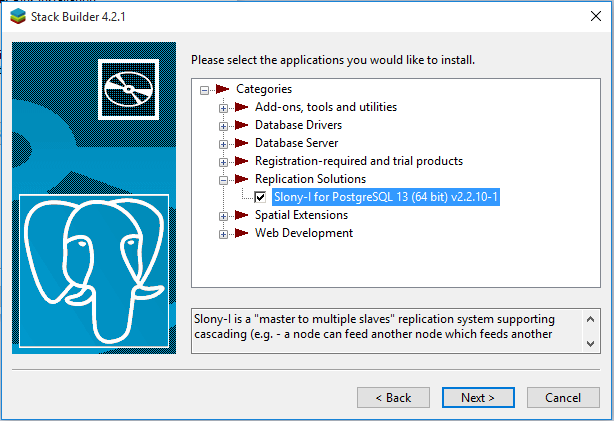
Then click the next button and installation of Slony-I will start from internet directly.
PREREQUISITES
- Use the same encoding on the master and slaves
- Use similar hardware and OS on all systems
- Keep the system clocks synchronized
- Use a single, unambiguous time zone on both systems
CONFIGURATION
postgresql.conf
Click on the postgresql.conf configuration file, on my machine located on
C:\Program Files\PostgreSQL\13\data\postgresql.conf
And then set listen_addresses = ‘*’ on both master and slave nodes then restart both PostgreSQL database Servers.
pg_hba.conf
Click on the Configure pg_hba.conf configuration file, on my machine located on
C:Program FilesPostgreSQL13datapg_hba.conf and set
host databasename user IPaddress/32 MD5
host databasename user Ipaddress/32 MD5
on both master and slave nodes and then reload both database servers.
slon.exe
This process represents a daemon. You need to run an instance of slon.exe for each node that you want in your replication network.
In this example we have 2 nodes, so we will be running 2 instances of slon.exe, one on each node.
There are two ways to run this daemon, either manually from the command line or by setting up a windows service. Both of them require an association to a daemon/node configuration file.
Option 1 starting slon.exe from the command line
This is the most basic form of running the daemon. The only parameter that it needs to start is -f followed by a configuration file.
master.conf:

cluster_name='slony_cluster'
conn_info='dbname=master host= 172.20.0.85 port=5433 user=postgres password=postgres'

 slave1.conf:

cluster_name='slony_cluster'
conn_info='dbname=slave1 host= 172.20.0.86 port=5433 user=postgres password=postgres'
From the master node’s command line you should run:
C:Program FilesPostgreSQL13bin> slon.exe -f master.conf
From slave node’s command line you should run:
C:Program FilesPostgreSQL13bin> slon.exe -f slave1.conf
Option 2 starting slon.exe from the command line
If you don’t want to manually run the slon.exe executable every time your node starts, you can instead configure it as a service. slon.exe comes with additional functionality to configure itself
This procedure involves two steps. Service registration and engine registration
A. Service Registration
In order to register your Slony-I service, you must issue the following command:
C:Program FilesPostgreSQL13bin> slon.exe –regservice servicename
Where servicename will be the name of your service.
From the master node’s command line you should run:
C:Program FilesPostgreSQL13bin>slon.exe -regservice master_service

Service registered.
Before you can run Slony, you must also register an engine!
From slave node’s command line you should run:
C:Program FilesPostgreSQL13bin>slon.exe -regservice slave_service

Service registered.
Before you can run Slony, you must also register an engine!
And then start the service by invoking the following command: services.msc
B. Engine Registration
If you managed to follow the above steps correctly, you should have one service registered per node. That’s good. However, you might have noticed that we haven’t mentioned anything about any connection to any database so far and the services will not be of much use until we do. The way to do this is by adding engines to the service. What are engines you may ask. Think of engines as different instances of the slon.exe daemon with each instance having its own configuration file.
To add an engine:
From the master node’s command line you should run:
C:Program FilesPostgreSQL13bin>slon.exe -addengine master_service D:merebconfigmaster.conf
Engine added.
NOTE! You need to restart the Slony service before this takes effect
From slave node’s command line you should run:
C:Program FilesPostgreSQL13bin>slon.exe -addengine master_service D:merebconfigslave1.conf

Engine added.
NOTE! You need to restart the Slony service before this takes effect.
When the commands run successfully, they will respond with a message: Engine added like the message above.
From now on, all your services administration can be done from the standard windows service management console, which can be accessed from the command line of each node by invoking the following command: services.msc
From there you can start and stop your service along with all the engines it manages.
slonik.exe
Once you have the services up and running for all your nodes, it’s time to start telling slony how you want your nodes interacting with each other. So far, they are all just nodes with no specific roles and no replication rules.
All the configuration is done by means of slonik scripts that are written in a scripting language called slonik. This scripting language comes with its own interpreter called slonik.exe that you will feed with configuration scripts. The idea would be to build one configuration script per node, and run it through slonik.exe. If everything goes well, that will be all you need to get your replication going.
The master node’s demo script
master.slonik:

---Declare Cluster
cluster name = slony_cluster;

---Declare Node
node 1 admin conninfo = 'dbname=master host=172.20.0.85 port=5433 user=postgres password=postgres';

---Create a schema in the database
init cluster (id=1, comment = 'master node');

---Create a set
create set (id=1, origin=1, comment= 'my replication set');

--- Add table to the set
set add table (set id=1, origin=1, id=1, fully qualified name = 'public.table_a', comment= '');
The slave node’ s demo script
 slave1.slonik:

---Declare Cluster
cluster name=slony_cluster;

node 1 admin conninfo = 'dbname=master host=172.20.0.85 port=5433 user=postgres password=postgres';

node 2 admin conninfo = 'dbname=slave1 host=172.20.0.86 port=5433 user=postgres password=postgres';

---Add a slave
store node (id = 2, comment = 'slave1', EVENT NODE = 1);

---Add paths between master and slave
store path (server = 1, client = 2, conninfo = 'dbname=master host=172.20.0.85 port=5433 user=postgres password=postgres');

store path (server = 2, client = 1, conninfo = 'dbname=slave1 host=172.20.0.86 port=5433 user=postgres password=postgres');

store listen (origin = 1, provider = 1, receiver = 2);

store listen (origin = 2, provider = 2, receiver = 1);

---Subscribe slave node
subscribe set (id = 1, provider = 1, receiver = 2, forward = yes);
Running the above slonik scripts
From the master node’s command line you should run:
C:Program FilesPostgreSQL13bin > slonik.exe master.slonik
From slave node’ s command line you should run:
C:Program FilesPostgreSQL13bin> slonik.exe slave1.slonik
Once the scripts are executed, the nodes will be configured and the replication should have already started.
Related Articles: