Standalone QGIS Development
Contents:
- INTRODUCTION
- ADVANTAGE OF DEVELOPING A STANDALONE QGIS APPLICATION
- SETTING UP THE DEVELOPMENT ENVIRONMENT
- PREREQUISITES
- CREATING A CUSTOMIZED STANDALONE QGIS
INTRODUCTION
QGIS is a free and open source cross platform geographic information system that enables us to display, maintain, edit and analyze map data with its corresponding attribute information.
QGIS uses OGR library to read and write maps and mainly supports map formats like ESRI Shapefile, Sqllite ,postgres, GML, GeoJSON,csv and so on. And, just like any desktop map application, QGIS offers much common GIS functionalities provided by core features and plugins.
The QGIS development team is in charge of maintaining and updating core features and these features are mainly developed with C++ for performance reason.
Unlike the core features, the plugins are currently maintained by individuals across the globe and can be sent to QGIS repository to make the plugins available for the public. Furthermore, beyond the core and plugin development, QGIS also provides API for standalone development which will be the focus of this topic.
ADVANTAGE OF DEVELOPING A STANDALONE QGIS APPLICATION
Since Plugin development is carried out as a part of extension to the existing installed QGIS and it will not give as much power as the standalone would.
Standalone development will enable the developers to make use of the very core QGIS libraries and develop a customized standalone QGIS desktop map application that fulfills the requirements that we define during the project startup.
And below are some of the advantages of developing a customized standalone QGIS application:
- Customize the Graphical User Interface (GUI)
- Only add features that we intend to use
- Put a middleware instead of direct database editing
- Add authorization and authentication module that can integrate with Active Directory
One can achieve some of the requirements listed above via existing core feature of QGIS called customization feature.
The customization feature gives rich control over adding/removing features. And, users of the system can choose what to add/remove according to their usage necessity.
Despite the presence of this customization feature, there might be a need to change the GUI from the very beginning of the splash screen by taking control over the native GUIs with new GUI elements designed with new icons and styles. Moreover, in order to achieve such a demand there is no other way but to do it with standalone development.
Another important aspect of standalone development is to able to bypass the way QGIS core features work. Moreover, direct database editing is one of the best features that QGIS provides, letting users to directly work on the production database.
SETTING UP THE DEVELOPMENT ENVIRONMENT
Prior to coding and start doing the development, we have to successfully set up the development environment that we need for developing standalone QGIS desktop map application. And the development environment basically consists of two major contents the GUI editor and code editor.
We mainly use Qt Designer to develop the user interface. It is a Qt tool for designing and creating GUI that can be seamlessly integrate with the code behind. And, it is done by wiring up with the signals the GUI triggered when interacted by the application user.
The second most important component is the code editing environment, which can be any python editor. Moreover, it is where we put the business logics and all code related stuffs.
PREREQUISITES
Qtdesigner
Download Qtdesigner from the official repository for your Operating system (it is cross platform and have packages for Windows, Linux and Mac OS).
Python
If your OS doesn’t have python then you can download from the official python repository.
PyQt
PyQt is a python binding for Qt libraries and it is the main backbone for wiring up the python programming language and Qt Designer.
Download PyQt for appropriate Python and Qt Designer versions. Besides, it is very important to use the right versions. Because, misdoing of it might lead to non-functional integration between the python and the Qt Designer version.
Python Editor
There are different python editors depending on the target operating system they are designed for. Beside the operating system difference, most of the python editors support latest python versions. And, among the widely known python editors are Komodo, PyCharm and PyScripter.
After setting up all the previous requirements, the next step is start creating the user interface design and write the code behind logic so as to achieve the necessary requirement from the application.
CREATING A CUSTOMIZED STANDALONE QGIS
This section of the article describes the consecutive steps to develop standalone Qgis and assuming that all the prerequisites are in place. In this example, we will use a case study approach just to show how to develop a standalone QGIS application.
Case Study
AHP company that works in exporting flowers to the world possesses an area of 30hectars in three different places in Adama. And, it is currently using Autodesk’s AutoCAD drawing maps to represent and manage the data.
The company is looking for a solution that give much better information than AutoCAD drawing maps like identifying information and easiness of use for people who have no GIS background.
Operational requirements from the solution:
- Load vector map specifically ESRI Shape file
- Pan
- Zoom to Extent, zoom in and Zoom out
The requirement for the application is simplicity of the user interface with the basic map navigation capability.
Addressing the requirement of AHP starts from creating the user interface and we will use the Qt Designer to implement it as mentioned on the prerequisites.
Designing GUI:
Steps to design user interface :
- Create a folder called AHP under the project directory which in this case is C:\Python27\Lib\site-packages\PyQt4\Project\CustomQgis
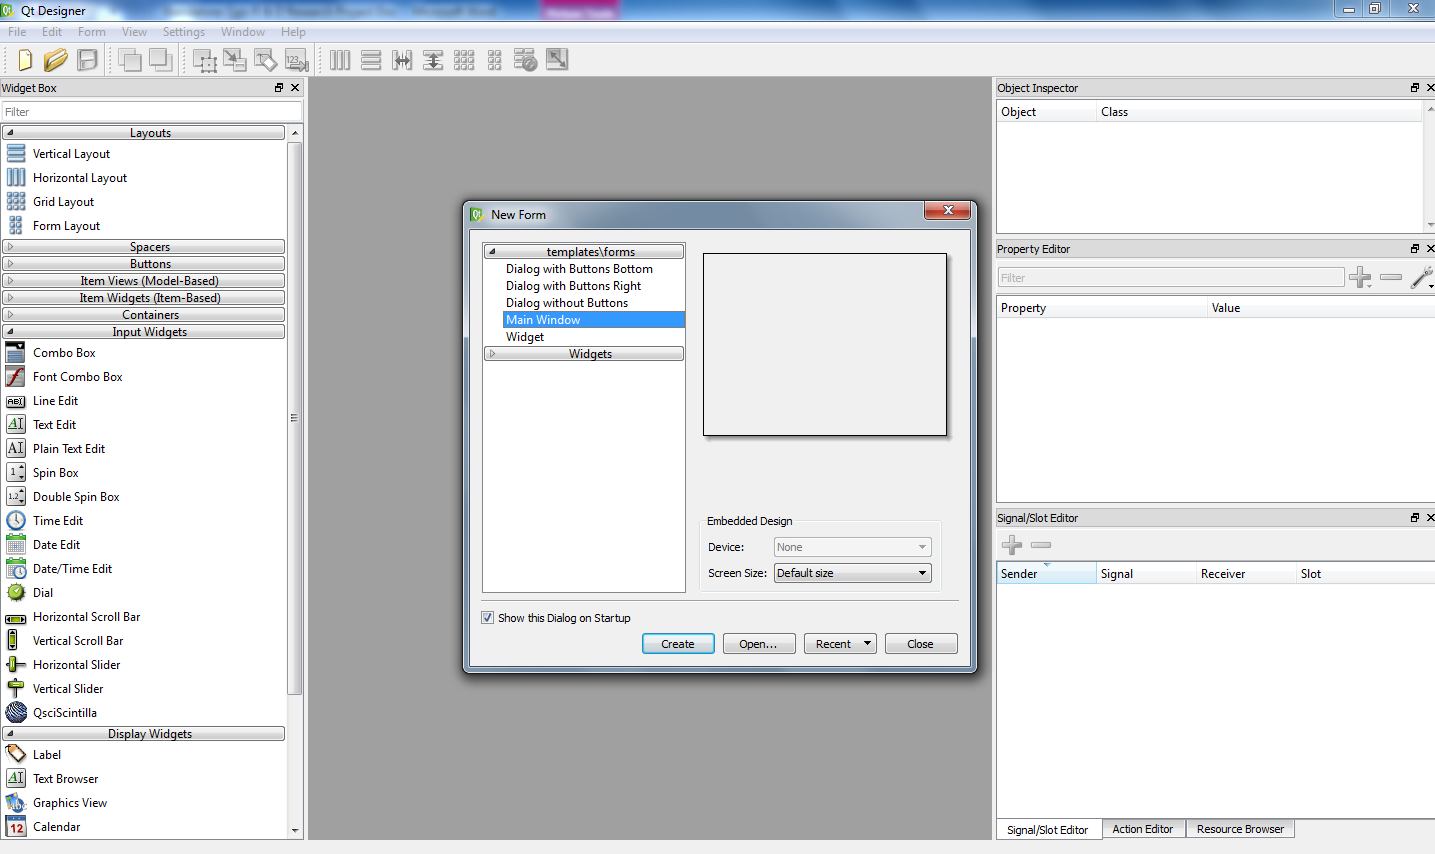
- Open Qt Designer and create a new map window from the new Form window.
- Add a frame from the container widgets to place the map in the canvas.
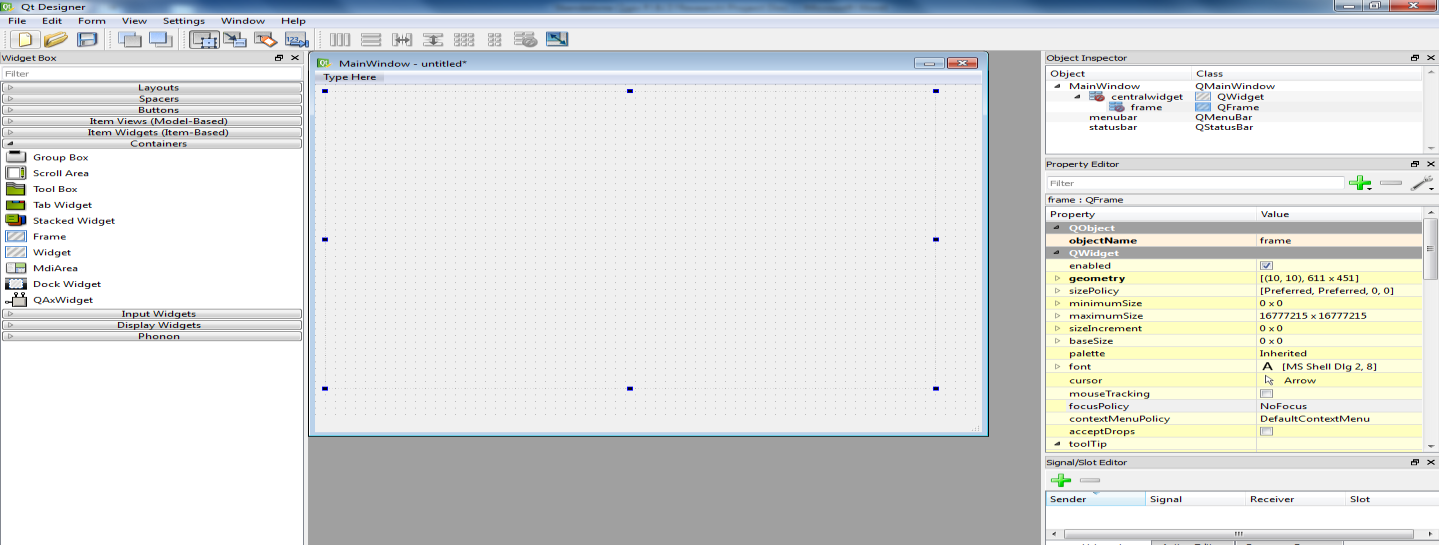
- Save it as main window user interface file (mainwindow_ui.ui) in AHP folder.
- Compile the previous user interface file using PyQt compiler. And open command prompt and navigate to the PyQt folder and type
pyuic4 -o mainwindow_ui.py mainwindow_ui.ui.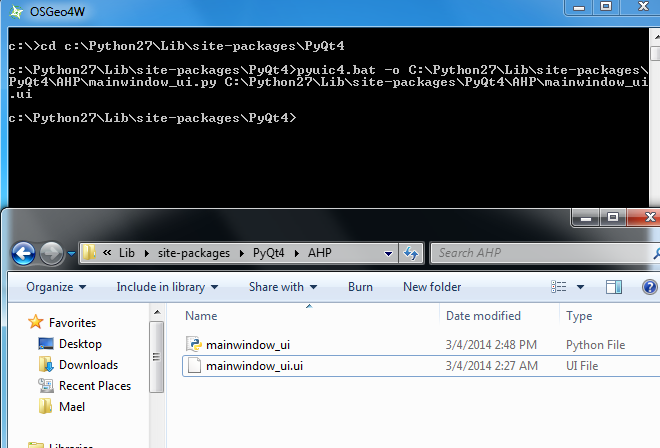
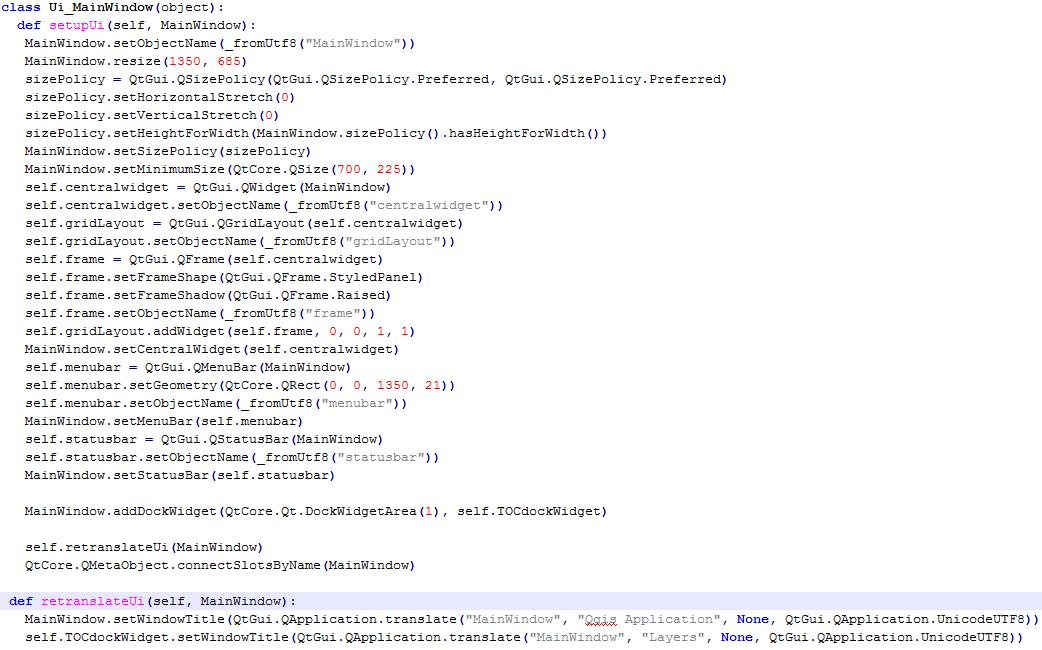
- On step 5 the python file for the user interface have been created. We will use the python editor to add some functionalities on top of it. And open the mainwindow_ui.py file using the python editor and you will have a piece of code like this.
 Now, we will create the main class that will handle all our operations associated with the user interface class.
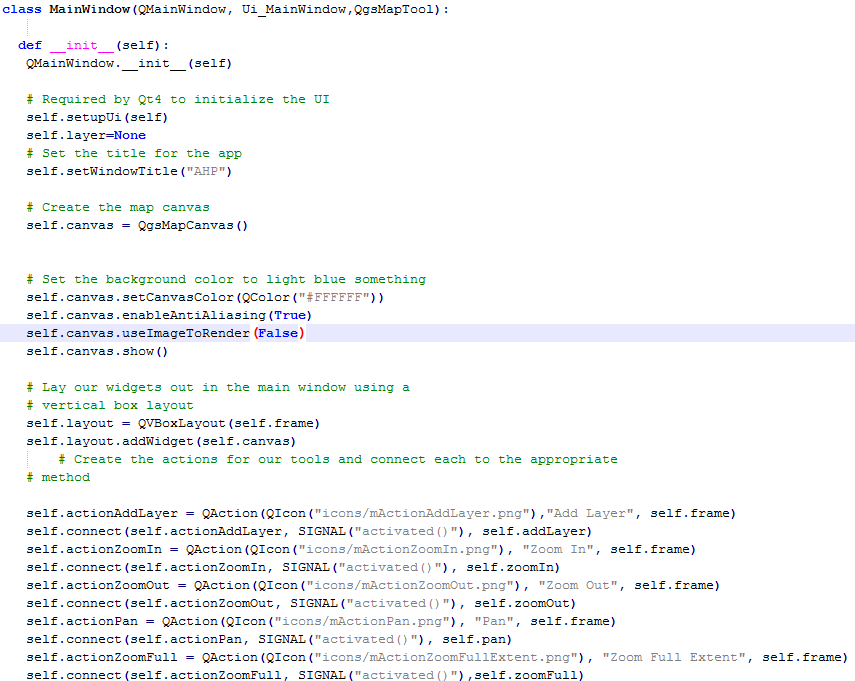 The __init__ method in python programming language is used as a constructor, therefore all initializations and setting will be done here in this method. And we will finally add toolbar and actions that are wired up with the toolbar.
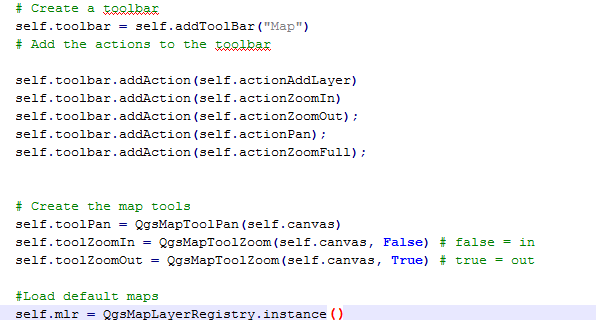
- Defining methods that are executed as a result of the actions triggered from toolbar in the previous step.
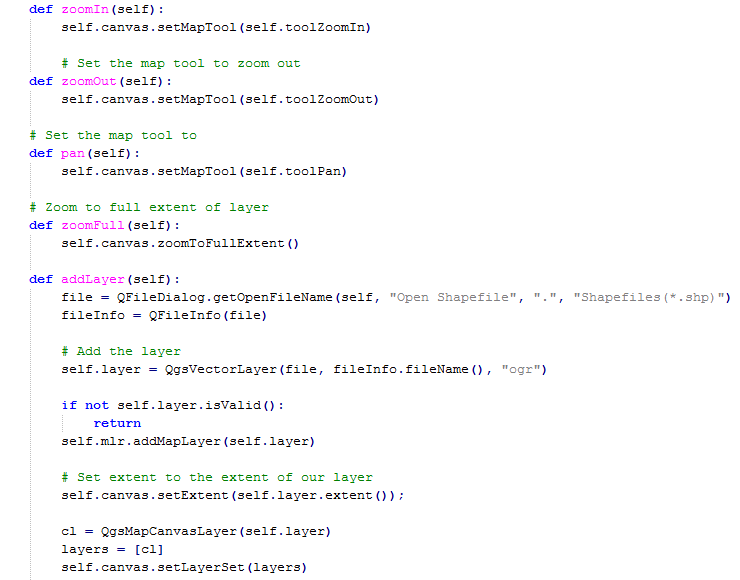 We have defined basic map navigational elements and a vector map browser to open ESRI Shape file.
 - Create the main method of the class __main__ to load all the previous methods and make them executable.
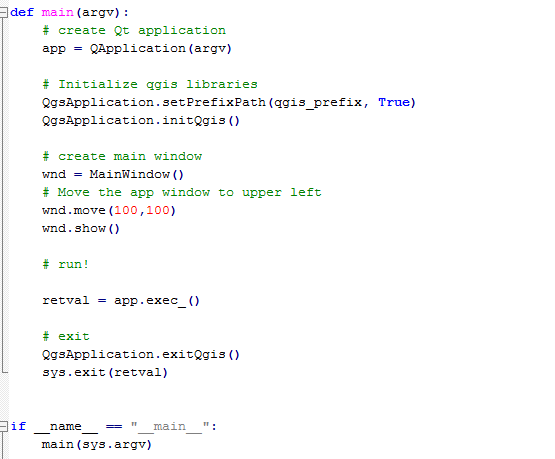
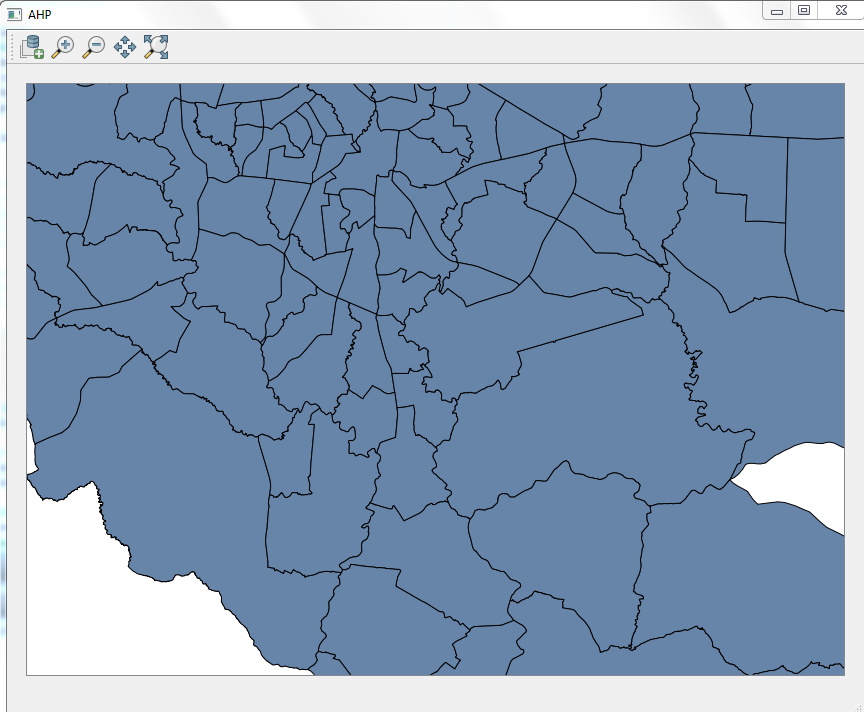
- Finally, running the application.
When the application runs we will see empty canvas then we can add a vector layer by clicking the icon then we can use the navigation tools to locate the plots